
Dojo is an open-source project, currently in its early development phase, and warmly welcomes contributors. For additional resources, join the community on Discord and check out the contribution guide.
Dojo: The Provable Game Engine
Dojo employs Cairo to deliver a robust architecture and toolset for designing autonomous worlds and onchain games. It features an integrated entity component system (ECS) and includes a native indexer, RPC testnet, and a comprehensive CLI management toolkit.
This book is dedicated to familiarizing you with the Dojo engine and the potential of Provable games. A special section on the Theory elucidates this emergent concept of autonomous worlds and Provable games.
Explainer
Here's a video of Cartridge's Tarrence explaining how Dojo works at the 2023 Autonomous Anonymous Summit:
Organizational Structure
Dojo is an open-source initiative, licensed under MIT, dedicated to promoting and advancing the concept of Autonomous Worlds (AWs). It is spearheaded by Cartridge, Realms & BibliothecaDAO, briq and many more contributors.
How do I get involved?
Check out our Github, our Twitter, Discord and contribution guide
What is Dojo?
Dojo is the culmination of lessons learned from attempts at building on-chain games, an emerging sector in the gaming industry. Any developer who has endeavored to build an on-chain game recognizes the inherent engineering hurdles - a realization that drove us to create Dojo. Just as you wouldn't recreate Unity every time you develop a new game, the same principle applies here. Dojo is designed to handle the complex infrastructure, allowing developers to focus on the unique aspects of their games.
Dojo aspires to be the go-to tool for building provable games. It is radically open-source, and all contributions are welcome.
Stop building infrastructure; start building games
Dojo's suite of tools takes the infrastructure complexity out of building on-chain games. It includes:
Entity Component System (ECS)
Dojo offers a standardized approach to building games on smart contracts. Recognizing the intricacies of game design, Dojo simplifies the development process, allowing creators to focus on gameplay logic. This standardization paves the way for an interconnected network of worlds, streamlining developer expertise and promoting game integration.
Utilizing the ECS (Entity Component System) as its core architecture, Dojo effectively manages the state and behavior of Autonomous Worlds (AWs). This model revolves around systems acting on entities, which are collections of pure data components. Systems efficiently determine which entities to process based on persistent queries over these components.
Read detailed information about the Dojo ECS.
Torii - Starknet Indexer
Building on-chain games often involves grappling with the challenge of indexing on-chain state. However, Dojo standardizes contract states to mirror traditional relational databases. This setup enables the Torii Indexer to auto-index all contract states, ensuring efficient and streamlined queries. Torii then exposes these states via a GraphQL API or gRPC (coming soon), allowing developers to easily query and retrieve data.
Using Torii drastically reduces the time and effort required to build on-chain games. It also eliminates the need to manually create indexers, which can be a tedious and error-prone process.
Katana - Blazingly fast development network
Katana is a customizable StarkNet development network. It is blazingly fast and allows you to iterate on your game logic swiftly.
Sozo CLI - CLI Management Tool
Dojo worlds are poised to become some of the largest contracts. Sozo is a CLI tool that assists you in managing your worlds. It enables you to create, build, test, and deploy your worlds. Additionally, you can craft new components and systems and register them with your world.
What Dojo doesn't give you
- Visual graphics - While Dojo provides networking and contracts, it doesn't offer graphical engines. You can bring your graphics of choice! Integrate your Dojo world with Unreal, Godot, or Unity.
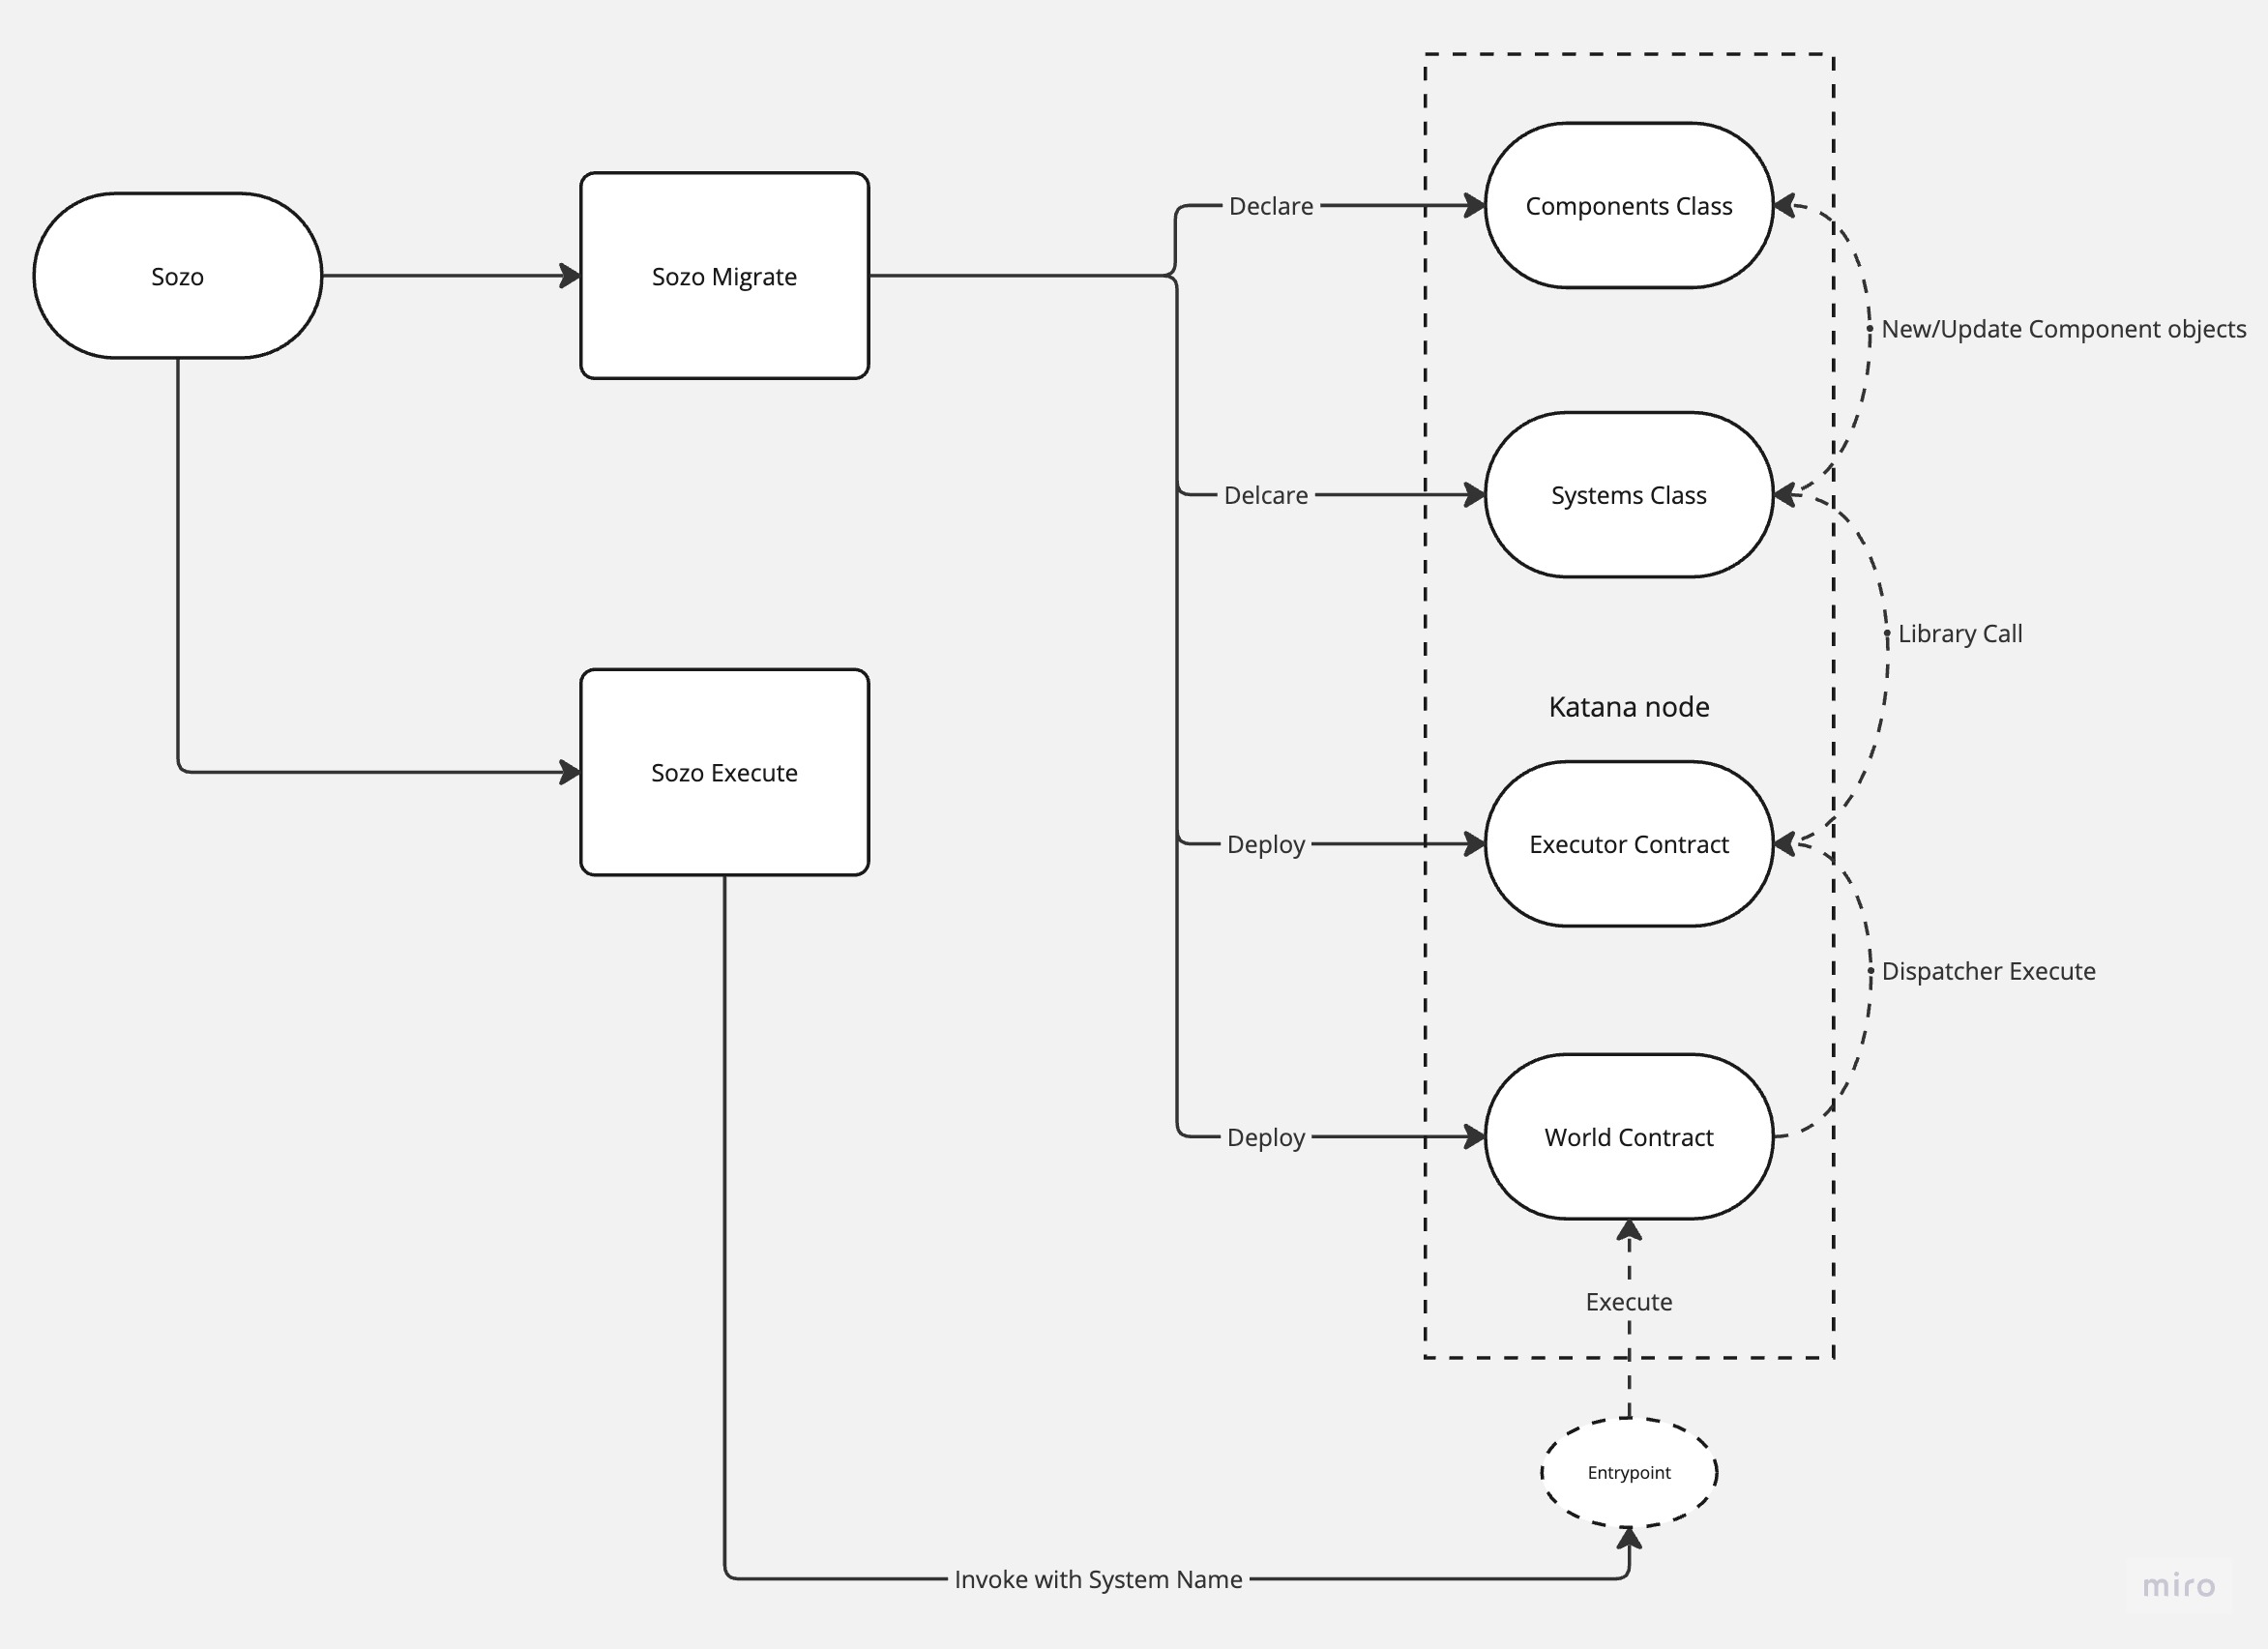
Understanding the Dojo Workflow: A Visual Guide
To help you understand how Sozo works, we've created a visual guide that outlines the flow of execution using the powerful sozo tool and the katana development network.
This visual representation will help you grasp the fundamental steps of working with Dojo, guiding you through the process of creating and managing your on-chain games.
Autonomous Worlds
"Autonomous worlds represent persistent, permissionless, and decentralized open environments that users can freely interact with and contribute to."
The precise definition of Autonomous Worlds (AWs) remains somewhat elusive, as it is more of an abstract concept that has yet to be fully crystallized. Lattice first introduced the terminology in 2022, but the notion of open worlds operating on the blockchain has been around for a while. The abstraction introduced by MUD served as a catalyst for the market to recognize the potential of these worlds.
Autonomous Worlds share notable similarities with blockchains in their fundamental nature. Once established, they persist, maintaining their state throughout the lifespan of the chain. Players can join or leave, and developers can expand these worlds by deploying features in a permissionless manner, much like how contracts are added to a chain. While there is no universally accepted definition for an Autonomous World, we believe that a game must possess at least the following two essential features to be considered as such:
-
Decentralized data availability layer: While the state execution may reside on a centralized layer, it is crucial that the state can be reconstructed if the execution layer ceases to exist. Rollups offer a solution, providing increased capacity execution layers while ensuring data is permanently settled on Ethereum. This guarantees the world's perpetual persistence.
-
Permissionless entry point for expanding the world: The World contract must be capable of accepting new systems and components without requiring permission. While this doesn't imply that every component and system will be utilized, they must adhere to this pattern, ensuring open and unrestricted access for potential enhancements.
We're firm believers in the potential for Autonomous Worlds to catalize the exploration of novel forms in the medium provided by zk proofs and blockchain technology. This is not only about games, but also about new forms of artwork, coordination, fun, emerging from tinkering and radical innovation, eventually questioning the very notion of "play" in this brave new decentralized and trustless world.
Homework
- Wired - Autonomous Worlds Primer
- 0xParc - Autonomous Worlds (Part 1)
- Gubsheep - The Strongest Crypto Gaming Thesis
- Lattice - MUD: An engine for Autonomous Worlds
- Guiltygyoza - Game 2.0
- Guiltygyoza - Composable Engineering
- Jay Springett - Wind-up Worlds
- Are.na collection on Autonomous Worlds
Provable games
Provable games demand zero-knowledge properties for efficient scaling and verification of computations. Cairo addresses this need by providing a generalized language, eliminating the complexity of creating circuits to incorporate SNARKs.
You can simply program in Cairo and your applications become automatically provable.
Moreover, you can deploy your programs on the Cairo Virtual Machine (CVM), which is compatible with Starknet's Layer 2, Starknet appchains, and even in-browser through WebAssembly (WASM)! Dojo aims to supply straightforward ZK primitives to fuel your game development.
For more information about Starknet, Cairo and its tech stack, check out the Starknet & Cairo book.
Cairo
Cairo is an open-source, Turing-complete smart contract language developed by Starkware, designed to power the Validity Rollup Starknet. The language enables highly expressive and verifiable computation, making it well-suited for building scalable and secure applications, including decentralized finance (DeFi) projects.
Dojo builds on Cairo to create a robust framework for developing Autonomous Worlds (AWs). By leveraging the capabilities of Cairo, Dojo aims to streamline the development process, improve maintainability, and enhance the performance of AWs.
A key feature of the Dojo framework is its use of commands. Commands are a design pattern that helps to reduce boilerplate code, resulting in cleaner and more maintainable applications. They achieve this by encapsulating specific actions or operations within self-contained, reusable units.
Developers can write commands freely within Systems, and the Cairo compiler takes care of inlining the appropriate functions.
Essential Reading
Starknet as an L2
Starknet is a Validity Rollup Layer 2 (L2) solution designed to scale Ethereum. It operates by offering high transaction throughput and low gas costs while maintaining the same level of security as Ethereum Layer 1 (L1). The strategy it uses is akin to solving a sudoku puzzle: verifying a solution is easier than finding the solution from scratch. Similarly, Starknet replaces heavy and costly L1 computation with cheaper L1 verification through the use of STARK proofs computed off-chain.
In more technical terms, Starknet is a permissionless Validity-Rollup (also known as a "ZK-Rollup") that supports general computation and currently runs as an L2 network over Ethereum. The network's L1 security is guaranteed by its utilization of the STARK cryptographic proof system, which is considered one of the safest and most scalable.
Starknet as an Appchain
Cairo is an isomorphic, general-purpose language, optimized for Zero-Knowledge (ZK) proofs. It's the driving force behind Starknet, Starkex, and appchains. Remarkably, you can also run it in WebAssembly (WASM) to generate proofs on the client-side! The Dojo team is working closely with the Madara team to enable Starknet appchains to seamlessly run Dojo worlds.
FAQs
Who owns Dojo?
Dojo is strictly open-source and uses the Apache 2.0 license. Anyone can use Dojo for free, and anyone can contribute to the project.
Why Dojo?
Dojo was created to solve problems the founders faced when building onchain games. It standardizes the process of building such games and provides a suite of tools to make it easier.
What is the Dojo roadmap?
Dojo is rapidly evolving. You can find open issues on the Dojo Github and join the Discord to get involved. If you have ideas for the project, please open an issue.
What is an onchain game?
Onchain games are games that exist entirely on a public blockchain network; all states and logic are onchain. Clients (like web browsers) do not exist on the chain but exist purely to interact with and interpret the onchain state.
What is an autonomous world?
An autonomous world is one that exists entirely onchain. It's not controlled by any single entity but is instead governed by the rules set within that world. Dive deeper into the topic here: Autonomous Worlds.
What is Cairo?
Cairo is an opensource programming language invented by Starkware. It's a Turing-complete language meant for general-purpose computation. It's a low-level language designed to compile to the Cairo Virtual Machine. Learn more about it here: Cairo.
What is a provable game?
Thanks to the magic of zero-knowledge proofs, we can ensure a game is fair by verifying a zk proof created off-chain. But what does that entail? Consider a game of chess. We aim for an experience where players trust each other's moves. In a straightforward approach — and given the simple rules of chess — if this were in a blockchain environment, every move would be a transaction on the blockchain. This is costly. We just want to know the winner, not every move.
With zk proofs and client communications, players can establish a state channel, sharing moves off-chain and ensuring their validity. At the end, a zk proof can be submitted to the blockchain to confirm the game's fairness. This constitutes a provable game.
Quick Start
It is worth reading theory to familiarize yourself with the concept of Autonomous Worlds (AWs) and the Cairo ecosystem before diving into the code.
Install Dojoup
Dojo is built around a set of development tools - Katana, Torii and Sozo. Install them all easily with Dojoup. You can find detailed information about Dojoup here.
curl -L https://install.dojoengine.org | bash
This will install Dojoup, then simply follow the instructions on-screen,
which will make the dojoup command available in your CLI.
dojoup
For full dojoup reference and debugging see Dojoup.
Next steps
Head to Hello Dojo to get create your first Dojo world.
Building from source
If you are just wanting to play with the toolchain, we strongly suggest following the Quick Start guide.
Prerequisites
You will need the Rust compiler and Cargo, the Rust package manager.
The easiest way to install both is with rustup.rs.
On Windows, you will also need a recent version of Visual Studio, installed with the "Desktop Development With C++" Workloads option.
Building
You can either use the different Dojoup flags:
dojoup --branch master
dojoup --path path/to/dojo
Or, by using a single Cargo command:
cargo install --git https://github.com/dojoengine/dojo --force sozo katana torii
Or, by manually building from a local copy of the Dojo repository:
# clone the repository
git clone https://github.com/dojoengine/dojo.git
cd dojo
# install Sozo
cargo install --path ./crates/sozo --force
# install Katana
cargo install --path ./crates/katana --force
# install Torii
cargo install --path ./crates/torii --force
Development Setup
This article is a guide to setting up a development environment for Dojo. It is not suggested to follow this guide if you are just wanting to play with the toolchain. We strongly suggest following the Quick Start guide.
Prerequisites
- Rust
- Cairo
Guide
Clone
git clone https://github.com/dojoengine/dojo.git
Linux & Mac
1. Install Rust and Dependencies
Start by installing Rust and running the test suite to confirm your setup:
rustup override set stable && rustup update && cargo test
Note: Depending on your Linux distribution, you may need to install additional dependencies. Make sure to install any suggested or missing dependencies that arise during the setup process.
2. Install Scarb Package Manager
Next, install the Scarb package manager by running:
curl --proto '=https' --tlsv1.2 -sSf https://docs.swmansion.com/scarb/install.sh | sh
3. Add the Cairo 1.0 VSCode Extension
Install the Cairo 1.0 extension for Visual Studio Code.
Windows
Coming soon
Container
Coming soon
Contributing to the Core
Dojo is an open-source project, currently in its early development phase, and warmly welcomes contributors.
How to Contribute
Head to the Github for open issues, if you see an issue that is unassigned, please request in the comments to be assigned to it. If you have an idea for a new feature, please create an issue with the enhancement tag.
Get Started
Hello Dojo
This section assumes that you have already installed the Dojo toolchain and are familiar with Cairo. If not, please refer to the Getting Started section.
Dojo in 15 Minutes
Think of Dojo as an abstraction over Cairo, similar to how React is to JavaScript. It enables you to write shorthand commands that expand into complex queries during compile time. Dojo is grounded in the well-known architecture known as the Entity Component System (ECS).
In Dojo, you design your worlds using Systems and Components. Systems outline the logic of your world, while components signify the state. This powerful pattern allows you to structure your logic in a highly modular way. If you don't understand this yet, don't fret; we'll delve into it in detail below.
To start, let's set up a project to run locally on your machine. From an empty directory, execute:
sozo init
Congratulations! You now have a local Dojo project. This command creates a dojo-starter project in your current directory. It's the ideal starting point for a new project and equips you with everything you need to begin.
Anatomy of a Dojo Project
Inspect the contents of the dojo-starter project, and you'll notice the following structure (excluding the non-cairo files):
src
  - components.cairo
  - systems.cairo
  - lib.cairo
Scarb.toml
Dojo projects largely resemble standard Cairo projects, with the distinction being some special attribute tags you use when creating Components and Systems. Let's explore this next.
Open the src/components.cairo file to continue.
#[derive(Component, Copy, Drop, Serde, SerdeLen)]
struct Moves {
    #[key]
    player: ContractAddress,
    remaining: u8,
}

#[derive(Component, Copy, Drop, Serde, SerdeLen)]
struct Position {
    #[key]
    player: ContractAddress,
    x: u32,
    y: u32
}

...rest of code
Notice the #[derive(Component, Copy, Drop, Serde, SerdeLen)] attributes. For a component to be recognized, we must include Component. This signals to the Dojo compiler that this struct should be treated as a component.
Our Moves component houses a remaining value in its state. The #[key] attribute informs Dojo that this component is indexed by the player field. If this is unfamiliar to you, we'll clarify its importance later in the chapter. Essentially, it implies that you can query this component using the player field.
In a similar vein, we possess a Position component that holds x and y values. Once again, this component is indexed by the player field.
Now, let's examine the src/systems.cairo file:
#[system]
mod spawn {
    use array::ArrayTrait;
    use box::BoxTrait;
    use traits::Into;
    use dojo::world::Context;

    use dojo_examples::components::Position;
    use dojo_examples::components::Moves;

    fn execute(ctx: Context) {
        let position = get!(ctx.world, ctx.origin, (Position));
        set!(
            ctx.world,
            (
                Moves {
                    player: ctx.origin, remaining: 10
                },
                Position {
                    player: ctx.origin, x: position.x + 10, y: position.y + 10
                },
            )
        );
        return ();
    }
}
Let us break this down:
#[system]Just as we use the #[derive(Component)] attribute, the #[system] attribute informs the Dojo compiler that this struct is a system, instructing it to compile accordingly.
fn execute(ctx: Context)You'll observe that the system features an execute function. It's crucial to note that all Dojo systems necessitate an execute function. This function accepts a Context as its parameter. The Context is a distinct struct that provides information about the world and the caller.
It's worth mentioning that a system can contain more than just the execute function. You're free to include numerous functions as needed. However, the execute function is mandatory since it's invoked when your system is executed.
Now lets look at the next line:
let position = get!(ctx.world, ctx.origin, (Position));Here we use get! command to retrieve the Position component for the ctx.origin entity. ctx.origin is the address of the caller. When called for the first time, it will return:
Position {
  player: 0x0, // zero address
  x: 0,
  y: 0
}
Now the next line:
set!(
    ctx.world,
    (
        Moves {
            player: ctx.origin, remaining: 10
            }, Position {
            player: ctx.origin, x: position.x + 10, y: position.y + 10
        },
    )
);
Here we use the set! command to set the Moves and Position components for the ctx.origin entity.
We covered a lot here in a short time. Let's recap:
- Explained the anatomy of a Dojo project
- Explained the importace of the
#[derive(Component)]and#[system]attribute - Explained the
executefunction - Explained the
Contextstruct - Touched on the
get!andset!commands
Run it locally!
Now that we have some theory out of the way, lets build the Dojo project!
sozo build
That compiled the components and system into an artifact that can be deployed! Simple as that!
Now lets deploy it to Katana! First we need to get Katana running:
katana --disable-fee
Success! Katana should now be running locally on your machine. Now lets deploy!
sozo migrate --name test
This will deploy the artifact to Katana. You should see terminal output similar to this:
Migration account: 0x33c627a3e5213790e246a917770ce23d7e562baa5b4d2917c23b1be6d91961c

[1] 🌎 Building World state....
  > No remote World found
[2] 🧰 Evaluating Worlds diff....
  > Total diffs found: 7
[3] 📦 Preparing for migration....
  > Total items to be migrated (7): New 7 Update 0

# Executor
  > Contract address: 0x1a8cc7a653543337be184d21ceeb5cfc7e97af5ab7da5e4be77f373124d7e48
# World
  > Contract address: 0x71b95a2c000545624c51813444b57dbcdcc153dfc79b6b0e3a9a536168d1e16
# Components (2)
Moves
  > class hash: 0x3240ca67c41c5ae5557f87f44cca2b590f40407082dd390d893a514cfb2b8cd
Position
  > class hash: 0x4caa1806451739b6fb470652b8066a11f80e847d49003b43cca75a2fd7647b6
# Systems (3)
spawn
  > class hash: 0x1b949b00d5776c8ba13c2fdada38d4b196f3717c93c5c254c4909ed0eb249f7
move
  > class hash: 0x2534c514efeab524f24cd4b03add904eb540391e9966ebc96f8ce98453a4e1e
library_call
  > class hash: 0xabfd55d9bb6552aac17d78b33a6e18b06b1b95d4f684637e661dd83053fd45

🎉 Successfully migrated World on block #4 at address 0x71b95a2c000545624c51813444b57dbcdcc153dfc79b6b0e3a9a536168d1e16
Your 🌎 is now deployed at 0x71b95a2c000545624c51813444b57dbcdcc153dfc79b6b0e3a9a536168d1e16!
Let's discuss the Scarb.toml file in the project. This file contains environment variables that make running CLI commands in your project a breeze. (Read more about it here).
Add the world address to the bottom of the file:
world_address = "0x71b95a2c000545624c51813444b57dbcdcc153dfc79b6b0e3a9a536168d1e16"
This establishes the world address for your project. You can then run commands like:
sozo execute spawn
By doing so, you've just activated the spawn system. You now have a local world that you can interact with.
Indexing
With your local world set up, let's delve into indexing. You can index the entire world with this simple command:
torii
Executing the above activates a local torii server using SQLite as its database, which is exposed at http://0.0.0.0:8080. It will automatically index your world into tables, allowing you to query them using GraphQL.
We've covered quite a bit! Here's a recap:
- Built a Dojo world
- Deployed the project to Katana
- Ran the spawn system locally
- Indexed the world with Torii
Next Steps
This overview provides a rapid end-to-end glimpse into Dojo. However, the potential of these worlds is vast! Designed to manage hundreds of systems and components, Dojo is equipped for expansive creativity. So, what will you craft next?
Config
Dojo worlds are defined in their Scarb.toml files. This is just a Scarb file which is an excellent Cairo package manager and project manager.
Full example of a Scarb.toml file:
[package]
cairo-version = "2.1.0-rc4"
name = "dojo_examples"
version = "0.1.0"

[cairo]
sierra-replace-ids = true

[dependencies]
dojo = { git = "https://github.com/dojoengine/dojo" }

[[target.dojo]]

[tool.dojo]
initializer_class_hash = "0xbeef"

[tool.dojo.env]
rpc_url = "http://localhost:5050/"

# account address of world deployer
account_address = "0x33c627a3e5213790e246a917770ce23d7e562baa5b4d2917c23b1be6d91961c"

# private key of world deployer
private_key = "0x333803103001800039980190300d206608b0070db0012135bd1fb5f6282170b"

# world contract address
world_address = "0x789c94ef39aeebc7f8c4c4633030faefb8bee454e358ae53d06ced36136d7d6"
World Contract
The world contract functions as a central system kernel, serving as the foundation for initiating and resolving all interactions. Within this kernel, contracts are deployed, registered, and executed, streamlining the process for downstream systems by enabling clients to engage with a single contract rather than potentially hundreds.
Dojo core abstracts this contract away from the developer as a developer you do not write it and it is not meant to be altered when building a world. However, it's important to understand how it works and how it interacts with the rest of the system.
To think about: Consider Autonomous Worlds as sovereign blockchains residing within another blockchain - a nested blockchain, so to speak. Just as you can deploy contracts onto Ethereum to enhance its functionality, you can similarly introduce systems into the World contract to enrich its features. While anyone can contribute to the World, akin to Ethereum, authorization is required to interact with component state. There is a dedicated topic to Authorisation.
Context
You will notice every System accepts a Context struct as the first parameter. This is a special struct that contains information about the world and the caller.
#[derive(Copy, Drop, Serde)]
struct Context {
    world: IWorldDispatcher, // Dispatcher to the world contract
    origin: ContractAddress, // Address of the origin
    system: felt252, // Name of the calling system
    system_class_hash: ClassHash, // Class hash of the calling system
}
The uuid() command
It is often useful to generate unique IDs for entities. The uuid() fn can be used to generate a unique ID.
Use it like this:
let game_id = ctx.world.uuid();Full World API
The world exposes an interface which can be interacted with by any client.
// World interface
#[starknet::interface]
trait IWorld<T> {
    fn component(self: @T, name: felt252) -> ClassHash;
    fn register_component(ref self: T, class_hash: ClassHash);
    fn system(self: @T, name: felt252) -> ClassHash;
    fn register_system(ref self: T, class_hash: ClassHash);
    fn uuid(ref self: T) -> usize;
    fn emit(self: @T, keys: Array<felt252>, values: Span<felt252>);
    fn execute(ref self: T, system: felt252, calldata: Array<felt252>) -> Span<felt252>;
    fn entity(
        self: @T, component: felt252, keys: Span<felt252>, offset: u8, length: usize
    ) -> Span<felt252>;
    fn set_entity(
        ref self: T, component: felt252, keys: Span<felt252>, offset: u8, value: Span<felt252>
    );
    fn entities(
        self: @T, component: felt252, index: felt252, length: usize
    ) -> (Span<felt252>, Span<Span<felt252>>);
    fn set_executor(ref self: T, contract_address: ContractAddress);
    fn executor(self: @T) -> ContractAddress;
    fn delete_entity(ref self: T, component: felt252, keys: Span<felt252>);
    fn origin(self: @T) -> ContractAddress;

    fn is_owner(self: @T, account: ContractAddress, target: felt252) -> bool;
    fn grant_owner(ref self: T, account: ContractAddress, target: felt252);
    fn revoke_owner(ref self: T, account: ContractAddress, target: felt252);

    fn is_writer(self: @T, component: felt252, system: felt252) -> bool;
    fn grant_writer(ref self: T, component: felt252, system: felt252);
    fn revoke_writer(ref self: T, component: felt252, system: felt252);
}
Components
Components = Data
Components serve as the foundation for defining the world's structure, encapsulating state for systems to mutate.
When designing a world's components, it is crucial to carefully consider the abstractions you create, always keeping composability in mind.
Components are Structs
Components are defined as structs in Cairo. They can contain any number of fields, however it is best practice in ECS to have small isolated components. This promotes modularity and composability, allowing you to reuse components across multiple entity types.
#[derive(Component, Copy, Drop, Serde, SerdeLen)]
struct Moves {
    #[key]
    player: ContractAddress,
    remaining: u8,
}
The #[key] attribute
The #[key] attribute indicates to Dojo that this component is indexed by the player field. You need to define a key for each component, as this is how you query the component. However, you can create composite keys by defining multiple fields as keys.
#[derive(Component, Copy, Drop, Serde, SerdeLen)]
struct Resource {
    #[key]
    player: ContractAddress,
    #[key]
    location: ContractAddress,
    balance: u8,
}
In this case you then would set the component with both the player and location fields:
set!(
    ctx.world,
    (
        Resource {
            player: ctx.origin,
            location: 12,
            balance: 10
        },
    )
);
Implementing Traits
Components can implement traits. This is useful for defining common functionality across components. For example, you may want to define a Position component that implements a PositionTrait trait. This trait could define functions such as is_zero and is_equal which could be used when accessing the component.
trait PositionTrait {
    fn is_zero(self: Position) -> bool;
    fn is_equal(self: Position, b: Position) -> bool;
}

impl PositionImpl of PositionTrait {
    fn is_zero(self: Position) -> bool {
        if self.x - self.y == 0 {
            return true;
        }
        false
    }

    fn is_equal(self: Position, b: Position) -> bool {
        self.x == b.x && self.y == b.y
    }
}
Custom Setting Components
Suppose we need a place to keep a global value with the flexibility to modify it in the future. Take, for instance, a global combat_cool_down parameter that defines the duration required for an entity to be primed for another attack. To achieve this, we can craft a component dedicated to storing this value, while also allowing for its modification via a decentralized governance model.
To establish these components, you'd follow the usual creation method. However, when initializing them, employ a constant identifier, such as GAME_SETTINGS_ID.
const GAME_SETTINGS_ID: u32 = 9999999999999;

#[derive(Component, Copy, Drop, Serde, SerdeLen)]
struct GameSettings {
    #[key]
    game_settings_id: u32,
    combat_cool_down: u32,
}
Types
Support Component types:
u8u16u32u64u128u256ContractAddress
It is currently not possible to use Arrays.
In practice with modularity in mind
Consider a tangible analogy: Humans and Goblins. While they possess intrinsic differences, they share common traits, such as having a position and health. However, humans possess an additional component. Furthermore, we introduce a Counter component, a distinct feature that tallies the numbers of humans and goblins.
#[derive(Component, Copy, Drop, Serde, SerdeLen)]
struct Potions {
    #[key]
    entity_id: u32,
    quantity: u8,
}

#[derive(Component, Copy, Drop, Serde, SerdeLen)]
struct Health {
    #[key]
    entity_id: u32,
    health: u8,
}

#[derive(Component, Copy, Drop, Serde, SerdeLen)]
struct Position {
    #[key]
    entity_id: u32,
    x: u32,
    y: u32
}

// Special counter component
#[derive(Component, Copy, Drop, Serde, SerdeLen)]
struct Counter {
    #[key]
    counter: u32,
    goblin_count: u32,
    human_count: u32,
}
So the Human will have a Potions, Health and Position component, and the Goblin will have a Health and Position component. By doing we save having to create Health and Position components for each entity type.
So then a system would look like this:
#[system]
mod spawnHuman {
    use array::ArrayTrait;
    use box::BoxTrait;
    use traits::Into;
    use dojo::world::Context;

    use dojo_examples::components::Position;
    use dojo_examples::components::Health;
    use dojo_examples::components::Potions;
    use dojo_examples::components::Counter;

    // we can set the counter value as a const, then query it easily! This pattern is useful for settins.
    const COUNTER_ID: u32 = 9999999999999;

    fn execute(ctx: Context, entity_id: u32) {

        let counter = get!(ctx.world, COUNTER_ID, (Counter));

        let human_count = counter.human_count + 1;
        let goblin_count = counter.goblin_count + 1;

        // spawn a human
        set!(
            ctx.world,
            (
                Health {
                    entity_id: human_count, health: 100
                    },
                Position {
                    entity_id: human_count, x: position.x + 10, y: position.y + 10,
                    },
                Potions {
                    entity_id: human_count, quantity: 10

                },
            )
        );

        // spawn a goblin
        set!(
            ctx.world,
            (
                Health {
                    entity_id: goblin_count, health: 100
                    },
                Position {
                    entity_id: goblin_count, x: position.x + 10, y: position.y + 10,
                    },
            )
        );

        // increment the counter
        set!(
            ctx.world,
            (
                Counter {
                    counter: COUNTER_ID, human_count: human_count, goblin_count: goblin_count
                },
            )
        );

        return ();
    }
}
A complete example can be found in the Dojo Starter
Systems
Systems = Logic
Systems underpin the logic of your world. While systems are inherently stateless, their primary role is to modify the state of components. Every system features an 'execute' function that's called upon during interactions within the world.
Let's look at the simplest possible system which mutates the state of the Moves component.
#[system]
mod Spawn {
    use array::ArrayTrait;
    use traits::Into;

    use dojo::world::Context;
    use dojo_examples::components::Position;
    use dojo_examples::components::Moves;

    fn execute(ctx: Context) {
        set !(
            ctx.world, ctx.origin, (
                Moves { player: ctx.origin, remaining: 10 }
            )
        );
        return ();
    }
}
The Execute function
The execute function is mandatory in a system and runs when called, taking Context as its first parameter. See more in Context.
Other functions in a System
You are free to add other functions to your system, but they will not be callable from the world. This is useful for breaking up your logic into smaller chunks.
Using View Functions
There are times when we need to compute the value of a component dynamically, rather than fetching its static state. For instance, in the context of a VRGDA, if you want to ascertain the current price, merely querying the component state won't suffice. Instead, you'd need to compute the price based on certain parameters and the current state.
This is where view functions come into play.
What are View Functions?
View functions are a way to derive or compute values from the existing state of a component. They are invoked by the world and receive the current state of the component as an argument. Subsequently, these functions return a computed value based on this state.
Example from VRGDA:
The below snippet, taken from the VRGDA example available on this link, illustrates how to implement a view function:
#[system]
mod view_price {
    //... other code ...

    fn execute(ctx: Context, game_id: u64, item_id: u128, amount: u128) -> Fixed {
        let mut auction = get!(ctx.world, (game_id, item_id), Auction);

        // Convert auction to VRGDA
        let VRGDA = auction.to_LogisticVRGDA();

        // Calculate time since the auction began
        let time_since_start: u128 = get_block_timestamp().into() - auction.start_time.into();

        // Compute the current price
        VRGDA.get_vrgda_price(
            FixedTrait::new(time_since_start, false), // Time elapsed since auction start
            FixedTrait::new(auction.sold, false)      // Quantity sold
        )
    }
}
In this example, the function computes and returns the current price of the VRGDA based on the ongoing state of the auction.
How to Invoke View Functions?
-
Using Dojo Core: If you are working within the Dojo Core, utilize the
callfunction. -
For Rust Users: The Starkli library provides a handy method to invoke view functions in Rust.
I hope this revised version enhances the clarity and flow of the information you want to convey!
System Authentication
Systems must be given permission to write to components. By default they have no permissions. With sozo we can however give them permissions to write to components.
sozo auth writer Moves Spawn
Here we have authorised the Spawn system to write to the Moves component.
Read more in the sozo docs.
Entities
Entities are the primary key value within the world, to which components can be attached.
Different ECS systems handle entities in various ways. In Dojo, entities are treated as a primary key value within the world, to which components can be attached. To illustrate this concept, consider a simple example of a character in a game that has a Moves and a Position component.
When defining the components for this entity, it is important to note that we do not reference the entity directly. Instead, we simply provide two structs that the entity will contain.
#[derive(Component, Copy, Drop, Serde, SerdeLen)]
struct Moves {
    #[key]
    player: ContractAddress,
    remaining: u8,
}

#[derive(Component, Copy, Drop, Serde, SerdeLen)]
struct Health {
    #[key]
    player: ContractAddress,
    x: u32,
    y: u32
}
Now, let's create a Spawn for the character. It is important to note that we have not explicitly defined an Entity anywhere. Instead, we use the ctx.origin to reference the current entity.
In this example we are using the ctx.origin to reference the current entity.
#[system]
mod spawn {
    use array::ArrayTrait;
    use box::BoxTrait;
    use traits::Into;
    use dojo::world::Context;

    use dojo_examples::components::Position;
    use dojo_examples::components::Moves;

    fn execute(ctx: Context) {
        let position = get!(ctx.world, ctx.origin, (Position));
        set!(
            ctx.world,
            (
                Moves {
                    player: ctx.origin, remaining: 10
                    }, Position {
                    player: ctx.origin, x: position.x + 10, y: position.y + 10
                },
            )
        );
        return ();
    }
}
ECS Theory: Plenty has been written on ECS systems, to go deeper read ECS-FAQ
Authorization
Authorization is crucial to a world, just like how authorization is crucial to any smart contract.
As discussed in the World chapter, Autonomous Worlds (AWs) function as sovereign chains nested within a public blockchain. These Worlds are also open to the public. This structure allows anyone to enhance a World by deploying components or systems. However, this openness also introduces security considerations. Similar to Ethereum, interacting with a component's state within a System requires the appropriate authorization from the component owner.
Auth Architecture
Every time a set! is called in a System, the world checks if the System has authorization to update the component state. Only when the System possesses the necessary authorization, the set! is executed. The following diagram illustrates the authorization architecture.

Providing Authorization
The deployer of the Component is its initial owner. A Component owner is able to grant the
ownerandwriterroles. Only owners can grant a System thewriterrole which allows it to update the Component.
sozo offers a convenient tool to authorize systems.
sozo auth writer Moves spawn
This command will generate a writer authorization for the spawn system to update the Moves component.
Commands
Understanding commands is key to understanding Dojo. You will leverage them heavily within the systems you design.
Commands in Dojo are generalized functions that are expanded at compile time to facilitate system execution. They provide a convenient way for systems to interact with the world state by abstracting common operations, such as retrieving or updating components, and generating unique IDs. By leveraging these commands, developers can streamline their system implementations and improve code readability.
Using commands
Commands are used within systems to interact with the world state. They are called using the following syntax:
let (position, moves) = get!(ctx.world, ctx.origin, (Position, Moves));The get! command
The get! command is used to retrieve components from the world state.
Use it like this:
let (position, moves) = get!(ctx.world, ctx.origin, (Position, Moves));Here we are retrieving the Position and Moves components from the world state. We are also using the ctx.origin to retrieve the components for the current entity.
You can then use position and moves as you would as any other Cairo struct.
The set! command
The set! command is used to update components state.
Use it like this:
set !(ctx.world, (
    Moves {
        player: ctx.origin, remaining: 10
    },
    Position {
        player: ctx.origin, x: position.x + 10, y: position.y + 10
    },
));

// If the structs are already defined it can also be written as:
set!(ctx.world, (moves, position));
Here we are updating the Moves and Position components in the world state using the ctx.origin as the entity id.
The emit! command
The emit! command is used to emit custom events.
Use it like this:
emit !(ctx.world, Moved { address: ctx.origin, direction });Events
Events play a pivotal role in decoding the dynamics of a Dojo world. Every time there's an update to a Component, the World contract emits these events. What's even more exciting is that you can craft your own custom events to fit specific needs! Moreover, thanks to Torii, all these events are seamlessly indexed, ensuring easy and efficient querying.
Component Events
Consider this example of a Moves component:
#[component]
struct Moves {
    #[key]
    player: Address,
    remaining: u32,
}
When this component is updated, the World contract will emit an event with the following structure:
#[derive(Drop, starknet::Event)]
struct StoreSetRecord {
    table: felt252, // Moves
    keys: Span<felt252>, // [player]
    offset: u8, // 0
    value: Span<felt252>, // [remaining]
}
This will then be captured by Torii and indexed for querying. This will allow you to then reconstruct the state of your world.
Similarly, when a component is deleted, the World contract will emit an event with the following structure:
#[derive(Drop, starknet::Event)]
struct StoreDelRecord {
    table: felt252,
    keys: Span<felt252>,
}
World Events
The World contract also emits events when it's initialized and when new components and systems are registered. These events are emitted with the following structures:
#[derive(Drop, starknet::Event)]
struct WorldSpawned {
    address: ContractAddress,
    caller: ContractAddress
}
#[derive(Drop, starknet::Event)]
struct ComponentRegistered {
name: felt252,
class_hash: ClassHash
}#[derive(Drop, starknet::Event)]
struct SystemRegistered {
name: felt252,
class_hash: ClassHash
}These events are also captured by Torii and indexed for querying.
Custom Events
Within your systems, emitting custom events can be highly beneficial. Fortunately, there's a handy emit! macro that lets you release events directly from your world. Use it like so:
emit !(ctx.world, Moved { address: ctx.origin, direction });Include this in your system and it will emit an event with the following structure:
#[derive(Drop, starknet::Event)]
struct Moved {
    address: felt252,
    direction: felt252,
}
Now a full example using a custom event:
fn execute(ctx: Context, direction: Direction) {
    let (mut position, mut moves) = get !(ctx.world, ctx.origin, (Position, Moves));
    moves.remaining -= 1;

    let next = next_position(position, direction);

    set !(ctx.world, (moves, next));
    emit !(ctx.world, Moved { address: ctx.origin, direction });
    return ();
}
Note: Read about the
get!andset!macros in Commands.
Testing
Testing is a crucial part of any software development process. Dojo provides a testing framework that allows you to write tests for your smart contracts. Since Dojo uses a custom compiler, you need to use sozo to test your contracts.
From your project directory, simply:
sozo test
This will search for all tests within your project and run them.
Writing Unit Tests
It is best practise to include unit tests in the same file as the Component/System you are writing.
Lets show a Component test example from the dojo-starter:
components.cairo
...rest of code

#[cfg(test)]
mod tests {
    use debug::PrintTrait;
    use super::{Position, PositionTrait};

    #[test]
    #[available_gas(100000)]
    fn test_position_is_zero() {
        let player = starknet::contract_address_const::<0x0>();
        assert(PositionTrait::is_zero(Position { player, x: 0, y: 0 }), 'not zero');
    }

    #[test]
    #[available_gas(100000)]
    fn test_position_is_equal() {
        let player = starknet::contract_address_const::<0x0>();
        let position = Position { player, x: 420, y: 0 };
        position.print();
        assert(PositionTrait::is_equal(position, Position { player, x: 420, y: 0 }), 'not equal');
    }
}
In this test we are testing the is_zero and is_equal functions of the Position component. It is good practise to test all functions of your components.
Writing Integration Tests
Integration tests are e2e tests that test the entire system. You can write integration tests for your world by creating a tests directory in your project root. Then create a file for each integration test you want to write.
This is the example from the dojo-starter:
systems.cairo
#[cfg(test)]
mod tests {
    use core::traits::Into;
    use array::ArrayTrait;

    use dojo::world::IWorldDispatcherTrait;

    use dojo::test_utils::spawn_test_world;

    use dojo_examples::components::position;
    use dojo_examples::components::Position;
    use dojo_examples::components::moves;
    use dojo_examples::components::Moves;
    use dojo_examples::systems::spawn;
    use dojo_examples::systems::move;

    #[test]
    #[available_gas(30000000)]
    fn test_move() {
        let caller = starknet::contract_address_const::<0x0>();

        // components
        let mut components = array::ArrayTrait::new();
        components.append(position::TEST_CLASS_HASH);
        components.append(moves::TEST_CLASS_HASH);

        // systems
        let mut systems = array::ArrayTrait::new();
        systems.append(spawn::TEST_CLASS_HASH);
        systems.append(move::TEST_CLASS_HASH);

        // deploy executor, world and register components/systems
        let world = spawn_test_world(components, systems);

        let spawn_call_data = array::ArrayTrait::new();
        world.execute('spawn', spawn_call_data);

        let mut move_calldata = array::ArrayTrait::new();
        move_calldata.append(move::Direction::Right(()).into());
        world.execute('move', move_calldata);
        let mut keys = array::ArrayTrait::new();
        keys.append(caller.into());

        let moves = world.entity('Moves', keys.span(), 0, dojo::SerdeLen::<Moves>::len());
        assert(*moves[0] == 9, 'moves is wrong');
        let new_position = world
            .entity('Position', keys.span(), 0, dojo::SerdeLen::<Position>::len());
        assert(*new_position[0] == 11, 'position x is wrong');
        assert(*new_position[1] == 10, 'position y is wrong');
    }
}
Useful Dojo Test Functions
spawn_test_world(components, systems) - This function will create a test world with the components and systems you pass in. It will also deploy the world and register the components and systems.
Dojo Modules
With standardization of Systems and Components we can create a module architecture for Dojo. This allows us to create reusable modules that can be used in any Dojo world.
Module Architecture
Think of modules as ERCs for Dojo. They are a standard way to create and share functionality. Modules are a collection of Systems and Components that can be imported into a Dojo world. Dojo is following the ERC patterns and has modules already defined for ERC20, ERC721, and ERC1155.
ERC20
Dojo's ERC20 module is a standard implementation of the ERC20 token standard, but it utilizes Dojo Systems and Components. This allows us to leverage the excellent properties of the ERC20 standard and use it natively within the Dojo environment.
Integration into Your World
To integrate the ERC20 module into your world, you must first deploy the ERC20 Dojo contract. Subsequently, install the systems and components into your world.
Overview
Dojo is BYO client, meaning that you can use any client you want to connect to the Dojo network.
Reference clients are available for the following platforms:
Javascript Libraries
Javascript is a great way to get started with Dojo. It's easy to use, and you can get started in minutes.
Examples using these:
@dojoengine/core
This is the lowest level library, and is used by all other downstream libraries. It contains the core functionality of Dojo and exposes the contract interfaces. Use it if you want to build your own library on top of Dojo.
yarn add @dojoengine/core
@dojoengine/react
This is a direct fork of Mud React
This library contains a set of React components that can be used when building React apps using Dojo.
yarn add @dojoengine/react
@dojoengine/create-burner
Create burner is a simply way to incorporate burner wallets into your Dojo app.
yarn add @dojoengine/create-burner
@dojoengine/core
This library abstracts away the world interface and provides a set of helper functions to interact with the world. It is preferred to use this library over interacting with the world directly.
- World explorers
- World deployers
- Games
- Anaylitics
Getting Started
yarn add @dojoengine/core
Example Usage
This is an example from Dojo React App
import { defineContractComponents } from "./contractComponents";
import { world } from "./world";
import { RPCProvider, Query, } from "@dojoengine/core";
import { Account, num } from "starknet";
import { GraphQLClient } from 'graphql-request';
import { getSdk } from '../generated/graphql';

export type SetupNetworkResult = Awaited<ReturnType<typeof setupNetwork>>;

export async function setupNetwork() {

    const provider = new RPCProvider(import.meta.env.VITE_PUBLIC_WORLD_ADDRESS, import.meta.env.VITE_PUBLIC_NODE_URL);

    return {
        contractComponents: defineContractComponents(world),
        provider,
        execute: async (signer: Account, system: string, call_data: num.BigNumberish[]) => provider.execute(signer, system, call_data),
        entity: async (component: string, query: Query) => provider.entity(component, query),
        entities: async (component: string, partition: number) => provider.entities(component, partition),
        world,
        graphSdk: getSdk(new GraphQLClient(import.meta.env.VITE_PUBLIC_TORII)),
        call: async (selector: string, call_data: num.BigNumberish[]) => provider.call(selector, call_data),
    };
}
dojoup
Update or revert to a specific Dojo branch with ease.
Installing
curl -L https://install.dojoengine.org | bash
Usage
To install latest stable version:
dojoup
Note: You may have to install
jqto usedojoup. You can do so with the following commands:
# Debian
sudo apt-get install jq

# Mac
brew install jq
To install a specific version (in this case the nightly version):
dojoup --version nightly
To install a specific branch (in this case the release/0.1.0 branch's latest commit):
dojoup --branch release/0.1.0
To install a fork's main branch (in this case tarrencev/dojo's main branch):
dojoup --repo tarrencev/dojo
To install a specific branch in a fork (in this case the patch-10 branch's latest commit in tarrencev/dojo):
dojoup --repo tarrencev/dojo --branch patch-10
To install from a specific Pull Request:
dojoup --pr 1071
To install from a specific commit:
dojoup -C 94bfdb2
To install a local directory or repository (e.g. one located at ~/git/dojo, assuming you're in the home directory)
Note: --branch, --repo, and --version flags are ignored during local installations.
dojoup --path ./git/dojo
Tip: All flags have a single character shorthand equivalent! You can use -v instead of --version, etc.
Precompiled binaries
Precompiled binaries are available from the GitHub releases page. These are better managed by using Dojoup.
ℹ️ Note
If you're on Windows, you will need to install and use Git BASH or WSL, as your terminal, since Dojoup currently does not support Powershell or Cmd.
Sozo
sozo is a powerful all-in-one tool for managing your Dojo projects. It helps with everything from scaffolding a new project, all the way to deploying and interacting with your Dojo Worlds. It includes a migration planning tool, designed to streamline the updating and deployment of AWs. It provides a robust command-line interface (CLI) that simplifies World management tasks, enabling you to focus on the creative aspects of World-building. In the future, it may include a GUI.
Features
- Binary CLI: Sozo provides an intuitive binary CLI, ensuring easy management of your Worlds, whether you're updating existing ones or deploying new ones.
Installation
sozo binary can be installed via dojoup, our dedicated installation package manager.
Installing from Source
git clone https://github.com/dojoengine/dojo
cd dojo
cargo install --path ./crates/sozo --locked --force
This will install Sozo and the required dependencies on your local system.
📚 Reference
See the
sozoReference for a complete overview of all the available subcommands.
sozo reference
Project Commands
World Commands
sozo init
init is used to initialize a new project. It will initialize a new project in the current directory by cloning the dojo-starter.
sozo init
sozo build
build is used to compile the cairo contracts, generating the necessary artifacts for deployment.
sozo build
sozo test
test is used to test the project's cairo contracts. It will run all tests found within the project.
sozo test
sozo migrate
migrate is used to perform the migration (deployment) process, declaring and deploying contracts as necessary to deploy or update the World.
Changes made to the local World after the initial deployment, can easily be pushed to the remote counterpart by running sozo migrate --world <WORLD_ADDRESS> with WORLD_ADDRESS being the address of the remote World. In the background, migrate will compute the diffs of the local and remote World, then, start constructing a migration strategy to determine, if any, which part of the local World needs to be pushed upstream.
USAGE
sozo migrate [OPTIONS]
OPTIONS
General Options
--name NAME
Name of the World. At the moment, the only usage for this option is to be used as a salt when deploying the World contract to avoid address conflicts. This option is required when performing the initial migration of the World.
World Options
--world WORLD_ADDRESS
The address of the World contract.
ENV: DOJO_WORLD_ADDRESS
Starknet Options
--rpc-url URL
The Starknet RPC endpoint. [default: http://localhost:5050]
ENV: STARKNET_RPC_URL
Account Options
--account-address ACCOUNT_ADDRESS
The Starknet account address.
ENV: DOJO_ACCOUNT_ADDRESS
Signer Options - Raw
--private-key PRIVATE_KEY
The raw private key associated with the account contract.
ENV: DOJO_PRIVATE_KEY
Signer Options - Keystore
--keystore PATH
Use the keystore in the given folder or file.
--password PASSWORD
The keystore password. Used with --keystore.
ENV: DOJO_KEYSTORE_PASSWORD
EXAMPLES
- Deploying your World for the first time to a local Katana node
sozo migrate --name ohayo --rpc-url http://localhost:5050
- Updating a remote World after making some changes
sozo migrate --world 0x123456
sozo execute
execute is used to execute a World's system.
Performing a system execution requires sending a transaction, therefore, execute expects an account address as well as its respective private key in order to sign the transaction before sending it.
USAGE
sozo execute <SYSTEM> [OPTIONS]
OPTIONS
General Options
--calldata CALLDATA
The calldata to be passed to the system that you want to execute.
Comma seperated values e.g., 0x12345,0x69420.
World Options
--world WORLD_ADDRESS
The address of the World contract.
ENV: DOJO_WORLD_ADDRESS
Starknet Options
--rpc-url URL
The Starknet RPC endpoint. [default: http://localhost:5050]
ENV: STARKNET_RPC_URL
Account Options
--account-address ACCOUNT_ADDRESS
The Starknet account address.
ENV: DOJO_ACCOUNT_ADDRESS
Signer Options - Raw
--private-key PRIVATE_KEY
The raw private key associated with the account contract.
ENV: DOJO_PRIVATE_KEY
Signer Options - Keystore
--keystore PATH
Use the keystore in the given folder or file.
--password PASSWORD
The keystore password. Used with --keystore.
ENV: DOJO_KEYSTORE_PASSWORD
EXAMPLES
- Executing the position system which takes two values (x: 0x77 and y: 0x44)
sozo execute position --calldata 0x77,0x44
sozo register
register is used to register new systems and components.
sozo register [OPTIONS] <COMMAND>
Commands:
  component  Register a component to a world.
  system     Register a system to a world.
  help       Print this message or the help of the given subcommand(s)
# example: component - register a component to a world
# this will register the Moves component to the world
sozo register component Moves

# example: system - register a system to a world
# this will register the spawn system to the world
sozo register system spawn
sozo system
system is used to interact with a World's systems. It is useful for querying about a system's information.
USAGE
sozo system <COMMAND>

Commands:
  get         Get the class hash of a system.
  dependency  Retrieve the component dependencies of a system.
SUBCOMMANDS
get
Get the class hash of a system
sozo system get <NAME>
Arguments
NAME
The name of the system
dependency
Retrieve the component dependencies of a system
sozo system dependency <NAME>
Arguments
NAME
The name of the system
OPTIONS
World Options
--world WORLD_ADDRESS
The address of the World contract.
ENV: DOJO_WORLD_ADDRESS
Starknet Options
--rpc-url URL
The Starknet RPC endpoint. [default: http://localhost:5050]
ENV: STARKNET_RPC_URL
EXAMPLES
- Get the class hash of the spawn system
sozo system get spawn
- Get the component dependencies of the spawn system
sozo system dependency spawn
sozo component
component is used to interact with a World's components. It is useful for querying about a component's information, or a component value of an entity.
USAGE
sozo component <COMMAND>

Commands:
  get     Get the class hash of a component
  schema  Retrieve the schema for a component
  entity  Get the component value for an entity
SUBCOMMANDS
get
Get the class hash of a component
sozo component get <NAME>
Arguments
NAME
The name of the component
schema
Retrieve the schema for a component
sozo component schema <NAME>
Arguments
NAME
The name of the component
entity
Get the component value for an entity
sozo component entity <NAME> [KEYS]...
Arguments
NAME
The name of the component
KEYS
The keys of the entity that you want to query.
Comma seperated values e.g., 0x12345,0x69420,...
OPTIONS
World Options
--world WORLD_ADDRESS
The address of the World contract.
ENV: DOJO_WORLD_ADDRESS
Starknet Options
--rpc-url URL
The Starknet RPC endpoint. [default: http://localhost:5050]
ENV: STARKNET_RPC_URL
sozo events
events is used to queries world events.
sozo events
sozo auth
auth is used to manage world authorization.
sozo auth [OPTIONS] <COMMAND>
Commands:
  writer  Auth a system with the given calldata.
  help    Print this message or the help of the given subcommand(s)
# example: writer - auth a system with the given calldata
# This will auth the spawn system with the writer role for Position component
sozo auth writer Position spawn
Katana
katana is a blazingly fast local Starknet node, designed to support local development with Dojo.
Features
- Starknet JSON-RPC v0.3.0 support
- Custom methods for manipulating the blockchain states
Installation
katana binary is available via dojoup.
Installing from source
git clone https://github.com/dojoengine/dojo
cd dojo
cargo install --path ./crates/katana --locked --force
Usage
$ katana


██╗  ██╗ █████╗ ████████╗ █████╗ ███╗   ██╗ █████╗
██║ ██╔╝██╔══██╗╚══██╔══╝██╔══██╗████╗  ██║██╔══██╗
█████╔╝ ███████║   ██║   ███████║██╔██╗ ██║███████║
██╔═██╗ ██╔══██║   ██║   ██╔══██║██║╚██╗██║██╔══██║
██║  ██╗██║  ██║   ██║   ██║  ██║██║ ╚████║██║  ██║
╚═╝  ╚═╝╚═╝  ╚═╝   ╚═╝   ╚═╝  ╚═╝╚═╝  ╚═══╝╚═╝  ╚═╝


PREFUNDED ACCOUNTS
==================

| Account address |  0x3ee9e18edc71a6df30ac3aca2e0b02a198fbce19b7480a63a0d71cbd76652e0
| Private key     |  0x300001800000000300000180000000000030000000000003006001800006600
| Public key      |  0x1b7b37a580d91bc3ad4f9933ed61f3a395e0e51c9dd5553323b8ca3942bb44e

| Account address |  0x33c627a3e5213790e246a917770ce23d7e562baa5b4d2917c23b1be6d91961c
| Private key     |  0x333803103001800039980190300d206608b0070db0012135bd1fb5f6282170b
| Public key      |  0x4486e2308ef3513531042acb8ead377b887af16bd4cdd8149812dfef1ba924d


ACCOUNTS SEED
=============
0


🚀 JSON-RPC server started: http://127.0.0.1:5050
📚 Reference
See the
katanaReference for an in depth reference and documentation on Katana.
katana reference
NAME
katana - Create a local testnet node for deploying and testing Starknet smart contracts.
USAGE
katana [OPTIONS]
DESCRIPTION
Create a local testnet node for deploying and testing Starknet smart contracts. Katana supports deployment and execution of the new as well as the legacy (Cairo 0) Cairo contracts.
This section covers an extensive list of information about Mining Modes, Supported RPC Methods, Katana flags and their usages. You can run multiple flags at the same time.
Mining Modes
In Katana, mining modes determine how frequent blocks are mined. By default, a new block is automatically mined as soon as a transaction is submitted.
You can switch from the default mining behaviour to interval mining, where a new block is created at a fixed time interval selected by the user. To enable this mode of mining, use the --block-time <SECONDS> flag, as demonstrated in the following example.
# Produces a new block every 10 seconds
katana --block-time 10
Supported Transport Layers
Only HTTP connection is supported at the moment. The server listens on port 5050 by default, but it can be changed by running the following command:
katana --port <PORT>
Starknet Feature Compatibility
Supported Transaction Type
| Type | Version |
|---|---|
| INVOKE | 1 |
| DECLARE | 1, 2 |
| DEPLOY_ACCOUNT |
Supported RPC Methods
Starknet Methods
Katana supports version v0.3.0 of the Starknet JSON-RPC specifications. The standard methods are based on this reference.
-
starknet_blockNumber -
starknet_blockHashAndNumber -
starknet_getBlockWithTxs -
starknet_getBlockWithTxHashes -
starknet_getBlockTransactionCount -
starknet_getTransactionByHash -
starknet_getTransactionByBlockIdAndIndex -
starknet_getTransactionReceipt -
starknet_pendingTransactions -
starknet_getStateUpdate -
starknet_call -
starknet_estimateFee -
starknet_chainId -
starknet_getNonce -
starknet_getEvents -
starknet_getStorageAt -
starknet_getClassHashAt -
starknet_getClass -
starknet_getClassAt -
starknet_syncing -
starknet_addInvokeTransaction -
starknet_addDeclareTransaction -
starknet_addDeployAccountTransaction
Custom Methods
Katana provides a convenient set of custom RPC methods to quickly and easily configure the node to suit your testing environment.
katana_generateBlock
Mine a new block which includes all currently pending transactions.
katana_nextBlockTimestamp
Get the time for the next block.
katana_increaseNextBlockTimestamp
Increase the time for the block by a given amount of time, in seconds.
katana_setNextBlockTimestamp
Similar to katana_increaseNextBlockTimestamp but takes the exact timestamp that you want in the next block.
katana_predeployedAccounts
Get the info for all of the predeployed accounts.
katana_setStorageAt
Set an exact value of a contract's storage slot.
OPTIONS
General Options
--silent
Don't print anything on startup.
--no-mining
Disable auto and interval mining, and mine on demand instead.
-b, --block-time <SECONDS>
Block time in seconds for interval mining.
--dump-state <PATH>
Dump the state of chain on exit to the given file.
If the value is a directory, the state will be written to <PATH>/state.bin.
--load-state <PATH>
Initialize the chain from a previously saved state snapshot.
-h, --help
Print help (see a summary with '-h').
-V, --version
Print version information.
Server Options
-p, --port <PORT>
Port number to listen on. [default: 5050]
--host <HOST>
The IP address the server will listen on.
Starknet Options
--seed <SEED>
Specify the seed for randomness of accounts to be predeployed.
--accounts <NUM>
Number of pre-funded accounts to generate. [default: 10]
--disable-fee
Disable charging fee for transactions.
Environment Options
--chain-id <CHAIN_ID>
The chain ID. [default: KATANA]
--gas-price <GAS_PRICE>
The gas price.
--validate-max-steps <VALIDATE_MAX_STEPS>
The maximum number of steps available for the account validation logic.
--invoke-max-steps <INVOKE_MAX_STEPS>
The maximum number of steps available for the account execution logic.
Shell Completions
katana completions shell
Generates a shell completions script for the given shell.
Supported shells are:
- bash
- elvish
- fish
- powershell
- zsh
EXAMPLES
Generate shell completions script for bash and appends it to a .bashrc file:
katana completions bash >> ~/.bashrc
EXAMPLES
- Create 15 dev accounts and disable transaction fee mechanism
katana --accounts 15 --disable-fee
- Set the chain id to
SN_GOERLIand run the server on port 8545
katana --chain-id SN_GOERLI --port 8545
- Load previously stored state and dump the state of this session to a file on shutdown
katana --load-state ./dump-state.bin --dump-state ./dump-state.bin
Torii - Networking & Indexing
Torii is an automatic indexer for dojo worlds. Built in rust to be blazingly fast and exceptionally scalable.
Dojo indexer
Torii indexes your dojo worlds and exposes a GraphQL API to query them. Simply run:
torii
and you'll have a GraphQL API running on http://localhost:8080!
Installation
The torii binary can be installed via dojoup, our dedicated installation package manager.
Installing from Source
If you prefer to install from the source code:
cargo install --path ./crates/torii --profile local --force
This will install Torii and the required dependencies on your local system.
📚 Reference
See the
toriiReference for a complete reference.
torii reference
Name
torii - An automatic indexer and networking layer for a world contract.
USAGE
torii [OPTIONS]
DESCRIPTION
torii starts the indexer and exposes GraphQL/gRPC API endpoints. The indexer queries the specified Starknet RPC endpoint for transaction blocks and listens for transactions related to the world contract. These transactions can include component/system registrations, entity state updates, system calls, and events. The parsed data is then stored in a local SQLite database.
The GraphQL and gRPC API endpoints run in tandem with the indexer, providing custom queries specific to the world contract for client applications.
Database URL
torii uses a sqlite database to store indexed data. The database can be stored either in-memory or persistently on the filesystem.
- The in-memory database is ephermal and only lasts as long as the indexer is running. This is a fast and simple option to start the indexer for development/testing.
- Presistent storage should be used in production. It relies on the local filesystem for storage.
Note: If using in-memory db, the memory will be garbage collected after a period of inactivity, causing queries to result in errors. A workaround is to start katana with the --block-time option or use a persistent database.
# Persistent database storage using file indexer.db
torii --database-url sqlite:indexer.db
OPTIONS
General Options
-w, --world
Address of the world contract to index
--rpc
Starknet RPC endpoing to use [default: http//localhost:5050]
-m, --manifest <MANIFEST>
Specify a local manifest to initialize from
-d, --database-url <DATABASE_URL>
Database URL (read more above) [default: sqlite::memory:]
-s, --start-block <START_BLOCK>
Specify a block to start indexing from, ignored if stored head exists [default: 0]
-h, --help
Print help
-V, --version
Print version
Deploying Locally
Dojo is engineered for rapid development, boasting a lightning-fast local development environment named Katana. Katana serves as an on-device Starknet blockchain, allowing you to rigorously test your smart contracts before transitioning them to the a remote testnet.
Katana Deployments
Deploying to Katana could not be easier.
This assumes you have followed the Quick Start guide and have a project initialized.
From your project directory, run:
katana --disable-fee
This has started a local Katana which you can now deploy on!
Deploying to Katana
To deploy your project to Katana, run:
sozo migrate --name test
Note - this will only work if you have compiled your contracts. If you have not, run:
sozo build
Deployment to Remote Network
IMPORTANT: Dojo is unaudited. Use at your own risk.
Dojo makes it easy to deploy to remote networks, you just need to have a valid account and network endpoint.
Scarb.toml
[package]
name = "ohayoo"
version = "0.1.0"
cairo-version = "2.1.1"

[cairo]
sierra-replace-ids = true

[dependencies]
dojo = { git = "https://github.com/dojoengine/dojo.git" }

# # Katana
# rpc_url = "http://localhost:5050"
# account_address = "0x03ee9e18edc71a6df30ac3aca2e0b02a198fbce19b7480a63a0d71cbd76652e0"
# private_key = "0x0300001800000000300000180000000000030000000000003006001800006600"

#Madara
rpc_url = "https://api.cartridge.gg/x/shinai/madara"
account_address = "0x2"
private_key = "0xc1cf1490de1352865301bb8705143f3ef938f97fdf892f1090dcb5ac7bcd1d"
#world_address = "0x5b328933afdbbfd44901fd69a2764a254edbb6e992ae87cf958c70493f2d201"
Remote Katana
Katanas are able to be hosted and run as remote testnets, however this is not recommended for production use.
todo: add instructions for deploying to remote katana
Madara
Madara is a blazinly fast Starknet sequencer. Built on the robust Substrate framework and fast, thanks to Rust 🦀, Madara delivers unmatched performance and scalability to power your Starknet-based Validity Rollup chain.
A public Madara testnet is available for deployment:
Testnet RPC: https://api.cartridge.gg/x/shinai/madara
You can use the following account to deploy:
# ...rest of Scarb.toml

rpc_url = "https://api.cartridge.gg/x/shinai/madara"
account_address = "0x2"
private_key = "0xc1cf1490de1352865301bb8705143f3ef938f97fdf892f1090dcb5ac7bcd1d"
Starknet
todo: add instructions for deploying to remote Starknet
Building a Chess Game
"I just finished reading The Dojo Book. What should I do next?"
The answers to this question are always "Make something!", sometimes followed by a list of cool projects. This is a great answer for some people, but others might be looking for a little more direction.
This guide is intended to fill the gap between heavily directed beginner tutorials and working on your projects. The primary goal here is to get you to write code. The secondary goal is to get you reading documentation.
If you haven't read the Dojo Book yet, it is highly encouraged for you to do so before starting this project.
What are we building?
We're building an on-chain chess game contract that lets you start a new game and play chess. This guide does not cover every rules of the chess game. You will build step by step as follows:
- A system to spawn all the chess pieces
- A system to make pieces move
- Add some functions to check a legal move
- Play chess ♟♙ - integration test!
The full code of tutorial is based on this repo.
If this seems too hard, don't worry! This guide is for beginners. If you know some basics about Cairo and Dojo, you're good. We won't make a full chess game with all the rules. We're keeping it simple.
What after this guide?
We're making another guide to help design the frontend. This will make our chess game complete.
After you finish all the five chapters, we can move on to the frontend guide.
0. Setup
Before starting recommend following the hello-dojo chapter to gain a basic understanding of the Dojo game.
Initializing the Project
Create a new Dojo project folder. You can name your project what you want.
mkdir dojo-chess
Open the project folder.
cd dojo-chess
And initialize the project using sozo init.
sozo init
Cleaning Up the Boilerplate
The project comes with a lot of boilerplate codes. Clear it all. Make sure both components.cairo and systems.cairo files are empty.
In lib.cairo, retain only:
mod components;
mod systems;
Compile your project with:
sozo build
Basic components
While there are many ways to design a chess game using the ECS model, we'll follow this approach:
Every square of the chess board (e.g., A1) will be treated as an entity. If a piece exists on a square, the square entity will hold that piece.
First, add this basic component to components.cairo file. If you are not familar with component syntax in Dojo engine, go back to this chapter.
#[derive(Component)]
struct Square {
    #[key]
    game_id: felt252,
    #[key]
    x: u32,
    #[key]
    y: u32,
    piece: Option<PieceType>,
}

enum PieceType {
    WhitePawn,
    WhiteKnight,
    WhiteBishop,
    WhiteRook,
    WhiteQueen,
    WhiteKing,
    BlackPawn,
    BlackKnight,
    BlackBishop,
    BlackRook,
    BlackQueen,
    BlackKing,
}
Basic systems
Starting from the next chapter, you will implement initiate and move systems one in each chapter. Let's create each system in its own file for better modularity.
Create a systems folder at src. Create initiate.cairoand move.cairo two files inside the folder. Each file should contain a basic system structure.
For example, initiate.cairo look like this:
#[system]
mod initiate_system {

}
and in systems.cairo we will use initiate_system like this:
mod initiate;

use initiate::initiate_system;
Do the same with the other systems. Update systems.cairo to:
mod initiate;
mod move;

use initiate::initiate_system;
use move::move_system;
Compile your project
Now try sozo build to build. Faced some errors?
error: Trait has no implementation in context:
You would probably faced some trait implementation errors, which you can implement as a derive like:
#[derive(Component, Drop, SerdeLen, Serde)]
struct Square {
    #[key]
    game_id: felt252,
    #[key]
    x: u32,
    #[key]
    y: u32,
    piece: Option<PieceType>,
}

#[derive(Serde, Drop, Copy, PartialEq)]
enum PieceType {
    WhitePawn,
    WhiteKnight,
    WhiteBishop,
    WhiteRook,
    WhiteQueen,
    WhiteKing,
    BlackPawn,
    BlackKnight,
    BlackBishop,
    BlackRook,
    BlackQueen,
    BlackKing,
}
Great! then let's solve this error.
error: Trait has no implementation in context: dojo::serde::SerdeLen::<core::option::Option::<dojo_chess::components::PieceType>>
 --> Square:80:54
                dojo::SerdeLen::<Option<PieceType>>::len()
                                                     ^*^
One thing you have to make sure is, that <Option<PieceType>> is the type that we created. So this type does not implement basic traits like SerdeLen. You need to define the implementation by your own.
impl PieceOptionSerdeLen of dojo::SerdeLen<Option<PieceType>> {
    #[inline(always)]
    fn len() -> usize {
        2
    }
}
Fix other issues as above, so that you can run the sozo build command runs successfully.
Run test
Before proceeding to the next chapter, remember that sozo build and sozo test are important steps to ensure your code is correct.
Run sozo test. Did you face any errors?
error: Trait has no implementation in context:
error: Variable not dropped. Trait has no implementation in context:
For the no implementation error, implement the PrintTrait to run sozo test successfully. For the not dropped error, add the Drop trait. Address other errors by adding derives or implementing them on a case-by-case basis.
Add more components
Before you move on, add more components so we can use them in the next chapter when creating systems.
Requirements
Colorenum enum with values White and BlackGamecomponent:
    game_id: felt252,
    winner: Option<Color>,
    white: ContractAddress,
black: ContractAddressGameTurncomponent:
    game_id: felt252,
turn: Color- We will later set game entity composed of the
GameandGameTurncomponents. - Run
sozo buildandsozo testand ensure all tests pass.
Try to solve on your own, and before you move on check the answer below.
Click to see full `components.cairo` code
use debug::PrintTrait;
use starknet::ContractAddress;

#[derive(Component, Drop, SerdeLen, Serde)]
struct Square {
    #[key]
    game_id: felt252,
    #[key]
    x: u32,
    #[key]
    y: u32,
    piece: Option<PieceType>,
}

#[derive(Serde, Drop, Copy, PartialEq)]
enum PieceType {
    WhitePawn,
    WhiteKnight,
    WhiteBishop,
    WhiteRook,
    WhiteQueen,
    WhiteKing,
    BlackPawn,
    BlackKnight,
    BlackBishop,
    BlackRook,
    BlackQueen,
    BlackKing,
}

#[derive(Serde, Drop, Copy, PartialEq)]
enum Color {
    White,
    Black,
}


impl PieceOptionSerdeLen of dojo::SerdeLen<Option<PieceType>> {
    #[inline(always)]
    fn len() -> usize {
        2
    }
}

impl ColorPrintTrait of PrintTrait<Color> {
    #[inline(always)]
    fn print(self: Color) {
        match self {
            Color::White(_) => {
                'White'.print();
            },
            Color::Black(_) => {
                'Black'.print();
            },
        }
    }
}

impl ColorOptionPrintTrait of PrintTrait<Option<Color>> {
    #[inline(always)]
    fn print(self: Option<Color>) {
        match self {
            Option::Some(color) => {
                color.print();
            },
            Option::None(_) => {
                'None'.print();
            }
        }
    }
}


impl BoardPrintTrait of PrintTrait<(u32, u32)> {
    #[inline(always)]
    fn print(self: (u32, u32)) {
        let (x, y): (u32, u32) = self;
        x.print();
        y.print();
    }
}


impl PieceTypeOptionPrintTrait of PrintTrait<Option<PieceType>> {
    #[inline(always)]
    fn print(self: Option<PieceType>) {
        match self {
            Option::Some(piece_type) => {
                piece_type.print();
            },
            Option::None(_) => {
                'None'.print();
            }
        }
    }
}


impl PieceTypePrintTrait of PrintTrait<PieceType> {
    #[inline(always)]
    fn print(self: PieceType) {
        match self {
            PieceType::WhitePawn(_) => {
                'WhitePawn'.print();
            },
            PieceType::WhiteKnight(_) => {
                'WhiteKnight'.print();
            },
            PieceType::WhiteBishop(_) => {
                'WhiteBishop'.print();
            },
            PieceType::WhiteRook(_) => {
                'WhiteRook'.print();
            },
            PieceType::WhiteQueen(_) => {
                'WhiteQueen'.print();
            },
            PieceType::WhiteKing(_) => {
                'WhiteKing'.print();
            },
            PieceType::BlackPawn(_) => {
                'BlackPawn'.print();
            },
            PieceType::BlackKnight(_) => {
                'BlackKnight'.print();
            },
            PieceType::BlackBishop(_) => {
                'BlackBishop'.print();
            },
            PieceType::BlackRook(_) => {
                'BlackRook'.print();
            },
            PieceType::BlackQueen(_) => {
                'BlackQueen'.print();
            },
            PieceType::BlackKing(_) => {
                'BlackKing'.print();
            },
        }
    }
}

impl ColorSerdeLen of dojo::SerdeLen<Color> {
    #[inline(always)]
    fn len() -> usize {
        1
    }
}

#[derive(Component, Drop, SerdeLen, Serde)]
struct Game {
    /// game id, computed as follows pedersen_hash(player1_address, player2_address)
    #[key]
    game_id: felt252,
    winner: Option<Color>,
    white: ContractAddress,
    black: ContractAddress
}


#[derive(Component, Drop, SerdeLen, Serde)]
struct GameTurn {
    #[key]
    game_id: felt252,
    turn: Color,
}

impl OptionPieceColorSerdeLen of dojo::SerdeLen<Option<Color>> {
    #[inline(always)]
    fn len() -> usize {
        1
    }
}
Congratulations! You've completed the basic setup for building an on-chain chess game 🎉
1. Initiate System
This chapter will address implementing initiate_system, which spawns the game and squares containing pieces.
What is initiate_system?
To play chess, you need to start the game and spawn the pieces. initiate_system will spawn the game entity and then place each piece in its proper position. Ensure the game status matches the correct piece type, and the right piece color is in its designated position on the board.
Requirements
Copy the unit tests below and paste them at the bottom of your systems/initiate.cairo file.
- Write an
executefunction in the system that accepts the world context, white address, and black address as input. - Implement the game entity, comprised of the
Gamecomponent andGameTurncomponent we created in the previous step. - Implement square entities by
Squarecomponent, from a1 to h8 containing the correctPieceType. - Run
sozo testand pass all the tests.
Test Flow
- Spawn the test world that imports the components and systems used in testing.
- Execute
initiate_systemby providing white and black player's wallet addresses as inputs. - Retrieve the game entity and piece entity created during
initiate_system. - Ensure the game has been correctly created.
- Verify that each
Pieceis located in the correctSquare.
Unit Tests
#[cfg(test)]
mod tests {
    use starknet::ContractAddress;
    use dojo::test_utils::spawn_test_world;
    use dojo_chess::components::{Game, game, GameTurn, game_turn, Square, square, PieceType};

    use dojo_chess::systems::initiate_system;
    use array::ArrayTrait;
    use core::traits::Into;
    use dojo::world::IWorldDispatcherTrait;
    use core::array::SpanTrait;

    #[test]
    #[available_gas(3000000000000000)]
    fn test_initiate() {
        let white = starknet::contract_address_const::<0x01>();
        let black = starknet::contract_address_const::<0x02>();

        // components
        let mut components = array::ArrayTrait::new();
        components.append(game::TEST_CLASS_HASH);
        components.append(game_turn::TEST_CLASS_HASH);
        components.append(square::TEST_CLASS_HASH);

        //systems
        let mut systems = array::ArrayTrait::new();
        systems.append(initiate_system::TEST_CLASS_HASH);
        let world = spawn_test_world(components, systems);

        let mut calldata = array::ArrayTrait::<core::felt252>::new();
        calldata.append(white.into());
        calldata.append(black.into());
        world.execute('initiate_system'.into(), calldata);

        let game_id = pedersen(white.into(), black.into());

        //get game
        let game = get!(world, (game_id), (Game));
        assert(game.white == white, 'white address is incorrect');
        assert(game.black == black, 'black address is incorrect');

        //get a1 square
        let a1 = get!(world, (game_id, 0, 0), (Square));
        match a1.piece {
            Option::Some(piece) => {
                assert(piece == PieceType::WhiteRook, 'should be White Rook');
            },
            Option::None(_) => assert(false, 'should have piece'),
        };
    }
}
Need help?
If you're stuck, don't hesitate to ask questions at the Dojo community!
You can find the answer for chapter 1 here.
2. Move System
This chapter will address the implementation of move_system, which relocates a piece on the board.
What is move_system?
To play chess, one must move the pieces on the board. Since we represent piece locations with a Square entity, the move_system retrieves the current position as (x,y). It also fetches the next position as (x,y), treating the piece in the current position square as the target to be moved to the next position.
Requirements
Copy the unit tests below and paste them at the bottom of your systems/move.cairo file.
- Write an
executefunction in the system with the following inputs:
 fn execute(
        ctx: Context,
        curr_position: (u32, u32),
        next_position: (u32, u32),
        caller: ContractAddress,
        game_id: felt252
)-
Update the Square with the
next_positionto contain the new piece and ensure the Square with thecurr_positionno longer holds a piece. -
Run
sozo testand ensure all tests pass.
Test Flow
- Follow the same logic as
test_initiatefrom the previous chapter. - Move the White Knight from (1,0) to (2,2) using the
move_system. - Retrieve the updated position and verify that the piece has successfully moved to its new location.
Unit Tests
#[cfg(test)]
mod tests {
    use starknet::ContractAddress;
    use dojo::test_utils::spawn_test_world;
    use dojo_chess::components::{Game, game, GameTurn, game_turn, Square, square, PieceType};

    use dojo_chess::systems::initiate_system;
    use dojo_chess::systems::move_system;
    use array::ArrayTrait;
    use core::traits::Into;
    use dojo::world::IWorldDispatcherTrait;
    use core::array::SpanTrait;

    #[test]
    #[available_gas(3000000000000000)]
    fn test_move() {
        let white = starknet::contract_address_const::<0x01>();
        let black = starknet::contract_address_const::<0x02>();

        // components
        let mut components = array::ArrayTrait::new();
        components.append(game::TEST_CLASS_HASH);
        components.append(game_turn::TEST_CLASS_HASH);
        components.append(square::TEST_CLASS_HASH);

        //systems
        let mut systems = array::ArrayTrait::new();
        systems.append(initiate_system::TEST_CLASS_HASH);
        systems.append(move_system::TEST_CLASS_HASH);
        let world = spawn_test_world(components, systems);

        // initiate
        let mut calldata = array::ArrayTrait::<core::felt252>::new();
        calldata.append(white.into());
        calldata.append(black.into());
        world.execute('initiate_system'.into(), calldata);

        let game_id = pedersen(white.into(), black.into());

         //White Knight is in (1,0)
        let b1 = get!(world, (game_id, 1, 0), (Square));
        match b1.piece {
            Option::Some(piece) => {
                assert(piece == PieceType::WhiteKnight, 'should be White Knight in (1,0)');
            },
            Option::None(_) => assert(false, 'should have piece in (1,0)'),
        };

        // Move White Knight (1,0) -> (2,2)
        let mut move_calldata = array::ArrayTrait::<core::felt252>::new();
        move_calldata.append(1);
        move_calldata.append(0);
        move_calldata.append(2);
        move_calldata.append(2);
        move_calldata.append(white.into());
        move_calldata.append(game_id);
        world.execute('move_system'.into(), move_calldata);

        //White Knight is in (2,2)
        let c3 = get!(world, (game_id, 2, 2), (Square));
        match c3.piece {
            Option::Some(piece) => {
                assert(piece == PieceType::WhiteKnight, 'should be White Knight in (2,2)');
            },
            Option::None(_) => assert(false, 'should have piece in (2,2)'),
        };
    }
}
Need help?
If you're stuck, don't hesitate to ask questions at the Dojo community!
3. Check Legal Move
In this chapter, we'll make functions to check:
- If the next move goes outside the board.
- If there's a piece that can be captured.
- If the next move is allowed for the type of piece.
- If the user can allow to make a action (based on the piece's color).
- ... You can also add other custom check functions.
Make Check Functions
We need to add some check functions in move_system. These will help make sure the next move is allowed.
- See if the next spot is allowed for the type of piece moving.
  fn is_right_piece_move(
        maybe_piece: Option<PieceType>, curr_position: (u32, u32), next_position: (u32, u32)
) -> bool {}- See if the next spot is still on the board.
fn is_out_of_board(next_position: (u32, u32)) -> bool{}- See if the person trying the move is doing it at the right time and with their piece color.
fn is_correct_turn(maybe_piece: PieceType, caller: ContractAddress, game_id: felt252) -> bool{}- You can also add other check functions to be extra sure the move is allowed.
Once you've made these check functions, you can use them in the main move_system function. You can decide how to set them up and which ones to use. We'll give an example to help:
    fn execute(
        ctx: Context,
        curr_position: (u32, u32),
        next_position: (u32, u32),
        caller: ContractAddress,
        game_id: felt252
    ) {
        //... upper code is the same
        //Check if next_position is out of board or not
        assert(is_out_of_board(next_position), 'Should be inside board');

        //Check if this is the right piece type move

        assert(
            is_right_piece_move(current_square.piece, curr_position, next_position),
            'Should be right piece move'
        );

        let target_piece = current_square.piece;

        // make current_square piece none and move piece to next_square
        current_square.piece = Option::None(());
        let mut next_square = get!(ctx.world, (game_id, next_x, next_y), (Square));

        //Check the piece already in next_suqare
        let maybe_next_square_piece = next_square.piece;
        match maybe_next_square_piece {
            Option::Some(maybe_piece) => {
                if is_piece_is_mine(maybe_piece) {
                    panic(array!['Already same color piece exist'])
                } else {
                    //Occupy the piece
                    next_square.piece = target_piece;
                }
            },
            //if not exist, then just move the original piece
            Option::None(_) => {
                next_square.piece = target_piece;
            },
        };
        // ... below code is the same

    }
Testing Each Function
Since we have different check functions, we need to test each one. To make this easier, let's use parts that are the same for many tests.
First, make a helper function called init_world_test. This will give back an IWorldDispatcher that we can use many times in the move system tests.
    #[test]
    #[available_gas(3000000000000000)]
    fn init_world_test() -> IWorldDispatcher {
        let white = starknet::contract_address_const::<0x01>();
        let black = starknet::contract_address_const::<0x02>();

        // components
        let mut components = array::ArrayTrait::new();
        components.append(game::TEST_CLASS_HASH);
        components.append(game_turn::TEST_CLASS_HASH);
        components.append(square::TEST_CLASS_HASH);

        //systems
        let mut systems = array::ArrayTrait::new();
        systems.append(initiate_system::TEST_CLASS_HASH);
        systems.append(move_system::TEST_CLASS_HASH);
        let world = spawn_test_world(components, systems);

        let mut calldata = array::ArrayTrait::<core::felt252>::new();
        calldata.append(white.into());
        calldata.append(black.into());
        world.execute('initiate_system'.into(), calldata);
        world
    }
Then, our main test_move function will be simpler.
    #[test]
    #[available_gas(3000000000000000)]
    fn test_move() {
        let white = starknet::contract_address_const::<0x01>();
        let black = starknet::contract_address_const::<0x02>();
        let world = init_world_test();
        let game_id = pedersen(white.into(), black.into());
        // other codes are same
    }
Now we can make tests that show errors if we try moves that aren't allowed. Let's make a test_piecetype_illegal function. This will check if the is_right_piece_move function, that you implemented in the move system, works right.
    #[test]
    #[should_panic]
    fn test_piecetype_ilegal() {
        let white = starknet::contract_address_const::<0x01>();
        let black = starknet::contract_address_const::<0x02>();
        let world = init_world_test();
        let game_id = pedersen(white.into(), black.into());

        let b1 = get!(world, (game_id, 1, 0), (Square));
        match b1.piece {
            Option::Some(piece) => {
                assert(piece == PieceType::WhiteKnight, 'should be White Knight');
            },
            Option::None(_) => assert(false, 'should have piece'),
        };

        // Knight cannot move to that square
        let mut move_calldata = array::ArrayTrait::<core::felt252>::new();
        move_calldata.append(1);
        move_calldata.append(0);
        move_calldata.append(2);
        move_calldata.append(3);
        move_calldata.append(white.into());
        move_calldata.append(game_id);
        world.execute('move_system'.into(), move_calldata);
    }
Finish by making your tests. These should find wrong moves and give back errors.
Need help?
If you're stuck, don't hesitate to ask questions at the Dojo community!
You can find the answer for chapter 3 here.
4. Test Contract
In this chapter, we'll use everything we've learned to run a full chess game scenario.
Here's what we'll do in our test:
- Spawn
white_pawn_1to (0,1) - Move
white_pawn_1to (0,3) - Move
black_pawn_2to (1,6) - Move
white_pawn_1to (0,4) - Move
black_pawn_2to (1,5) - Move
white_pawn_1to (1,5) - Capture
black_pawn_2
To place the pieces, use our initiate_system. For moving them, use the move_system. Remember to check if a piece can be captured when using move_system.
Before we get to the code, set up your integration test like this:
- Copy the test below and add it to your
src/tests.cairofile. - Make a
test.cairoin your src and updatelib.cairoby adding themod tests;line.
Full Code
#[cfg(test)]
mod tests {
    use starknet::ContractAddress;
    use dojo::test_utils::spawn_test_world;
    use dojo_chess::components::{Game, game, GameTurn, game_turn, Square, square, PieceType};

    use dojo_chess::systems::initiate_system;
    use dojo_chess::systems::move_system;
    use array::ArrayTrait;
    use core::traits::Into;
    use dojo::world::IWorldDispatcherTrait;
    use core::array::SpanTrait;


    #[test]
    #[available_gas(3000000000000000)]
    fn integration() {
        let white = starknet::contract_address_const::<0x01>();
        let black = starknet::contract_address_const::<0x02>();

        // components
        let mut components = array::ArrayTrait::new();
        components.append(game::TEST_CLASS_HASH);
        components.append(game_turn::TEST_CLASS_HASH);
        components.append(square::TEST_CLASS_HASH);

        //systems
        let mut systems = array::ArrayTrait::new();
        systems.append(initiate_system::TEST_CLASS_HASH);
        systems.append(move_system::TEST_CLASS_HASH);
        let world = spawn_test_world(components, systems);

        // initiate
        let mut calldata = array::ArrayTrait::<core::felt252>::new();
        calldata.append(white.into());
        calldata.append(black.into());
        world.execute('initiate_system'.into(), calldata);

        let game_id = pedersen(white.into(), black.into());

        //White pawn is now in (0,1)
        let a2 = get!(world, (game_id, 0, 1), (Square));
        match a2.piece {
            Option::Some(piece) => {
                assert(piece == PieceType::WhitePawn, "should be White Pawn in (0,1)");
            },
            Option::None(_) => assert(false, 'should have piece in (0,1)),
        };

        //Black pawn is now in (1,6)
        let b7 = get!(world, (game_id, 1, 6), (Square));
        match b7.piece {
            Option::Some(piece) => {
                assert(piece == PieceType::BlackPawn, "should be Black Pawn in (1,6)");
            },
            Option::None(_) => assert(false, 'should have piece in (1,6)),
        };

        //Move White Pawn to (0,3)
        let mut move_calldata = array::ArrayTrait::<core::felt252>::new();
        move_calldata.append(0);
        move_calldata.append(1);
        move_calldata.append(0);
        move_calldata.append(3);
        move_calldata.append(white.into());
        move_calldata.append(game_id);
        world.execute('move_system'.into(), move_calldata);

        //White pawn is now in (0,3)
        let a4 = get!(world, (game_id, 0, 3), (Square));
        match a4.piece {
            Option::Some(piece) => {
                assert(piece == PieceType::WhitePawn, "should be White Pawn in (0,3)");
            },
            Option::None(_) => assert(false, 'should have piece in (0,3)),
        };

        //Move black Pawn to (1,4)
        let mut move_calldata = array::ArrayTrait::<core::felt252>::new();
        move_calldata.append(1);
        move_calldata.append(6);
        move_calldata.append(1);
        move_calldata.append(4);
        move_calldata.append(black.into());
        move_calldata.append(game_id);
        world.execute('move_system'.into(), move_calldata);

        //Black pawn is now in (1,4)
        let b5 = get!(world, (game_id, 1, 4), (Square));
        match b5.piece {
            Option::Some(piece) => {
                assert(piece == PieceType::BlackPawn, "should be Black Pawn  in (1,4)");
            },
            Option::None(_) => assert(false, 'should have piece  in (1,4)),
        };

        // Move White Pawn to (1,4)
        // Capture black pawn
        let mut move_calldata = array::ArrayTrait::<core::felt252>::new();
        move_calldata.append(0);
        move_calldata.append(3);
        move_calldata.append(1);
        move_calldata.append(4);
        move_calldata.append(white.into());
        move_calldata.append(game_id);
        world.execute('move_system'.into(), move_calldata);

        let b5 = get!(world, (game_id, 1, 4), (Square));
        match b5.piece {
            Option::Some(piece) => {
                assert(piece == PieceType::WhitePawn, "should be WhitePawn  in (1,4)");
            },
            Option::None(_) => assert(false, 'should have piece in (1,4)),
        };
    }
}
Diving into the Code
First, we'll set up the players and their colors.
   let white = starknet::contract_address_const::<0x01>();
   let black = starknet::contract_address_const::<0x02>();
We should list both Components and Systems in arrays, with each having CLASS_HASH as elements.
// components
let mut components = array::ArrayTrait::new();
components.append(game::TEST_CLASS_HASH);
components.append(game_turn::TEST_CLASS_HASH);
components.append(square::TEST_CLASS_HASH);

//systems
let mut systems = array::ArrayTrait::new();
systems.append(initiate_system::TEST_CLASS_HASH);
systems.append(move_system::TEST_CLASS_HASH);
Next, we'll create our game world.
let world = spawn_test_world(components, systems);We use initiate_system to put our Square pieces on the board. Each Square holds a piece. The system's execute function needs some input, which we give it as calldata.
        // initiate
        let mut calldata = array::ArrayTrait::<core::felt252>::new();
        calldata.append(white.into());
        calldata.append(black.into());
        world.execute('initiate_system'.into(), calldata);
Let's check if a White pawn is at (0,1). Remember, to get a piece that exists on the square, you need to use the keys of the Square component, which are game_id, x, and y. Do the same check for the Black Pawn.
        //White pawn is now in (0,1)
        let a2 = get!(world, (game_id, 0, 1), (Square));
        match a2.piece {
            Option::Some(piece) => {
                assert(piece == PieceType::WhitePawn, "should be White Pawn in (0,1)");
            },
            Option::None(_) => assert(false, 'should have piece in (0,1)),
        };
After setting up the board, use move_system to make moves. Provide the current position, the next position, the player's address, and the game id.
 //Move White Pawn to (0,3)
        let mut move_calldata = array::ArrayTrait::<core::felt252>::new();
        move_calldata.append(0);
        move_calldata.append(1);
        move_calldata.append(0);
        move_calldata.append(3);
        move_calldata.append(white.into());
        move_calldata.append(game_id);
        world.execute('move_system'.into(), move_calldata);
Keep moving pieces and checking if they're in the right places.
Congratulations!
You've made the basic contracts for a chess game using the Dojo engine! This tutorial was just the beginning. There are many ways to make the game better, like optimizing parts, adding checks, or considering special cases. If you want to do more with this chess game, try these challenges:
- Make an
initiate_systemthat uses lazy init. If you're unsure about lazy init, read up on it. This can help make your game actions more efficient. - Add a checkmate feature. Our game doesn't end now, so decide when it should!
- Include special moves like castling, En Passant Capture, or Pawn Promotion.
- Make your own chess rules! You could even create your own version of the immortal game
Lastly, share your project with others in the Dojo community!
Contributing to Dojo Book
As the Dojo engine progresses and develops, it is essential for the Dojo book to keep pace with these advancements. Updating and refining the book ensures that it remains a relevant and valuable resource for those interested in understanding and utilizing the latest Dojo engine features and capabilities. All help is welcome!
The purpose of the book
The Dojo book is designed to be a comprehensive resource that caters to users at various levels of experience. It aims to serve as both an introductory guide for those new to Dojo and its ancillary packages, as well as a reference for more experienced users seeking to deepen their understanding of the engine's features and capabilities.
The book is split into some major chapters:
- Framework Theory
- Getting Started
- Building a World
Code of Conduct
The book follows the Rust Code of Conduct.
Ways to contribute
Issues
If you think that some content is missing or out-of-date, feel free to open an issue. If you find multiple pieces of content lacking, please open up a separate issue for each.
The issues will then be labeled so other contributors can find chunks of work they are interested in more easily.
The issue should contain what is missing, or what could be improved, in as much detail as you deem necessary.
Pull requests
Feel free to contribute changes to the book by opening a pull request - anything is welcome, from reformulating a sentence, fixing a typo, to adding new sections or chapters.
When your pull request is open, other contributors will take a look and may request changes. Do not be discouraged!
Writing style
This section documents a few standards for writing used throughout the book.
Chapters start with a second level heading
We use:
## Some Page
We do not use:
# Some Page